
一、SpringBoot整合rabbitmq
在Spring项目中,可以使用Spring-Rabbit去操作RabbitMQ,其是在spring boot项目中只需要引入对应的amqp启动器依赖即可,方便的使用RabbitTemplate发送消息,使用注解接收消息。
1、生产方搭建
创建生产方工程springboot-rabbit-production
- 添加依赖
<?xml version="1.0" encoding="UTF-8"?>
<project>
    <dependency>
         <groupId>org.springframework.boot</groupId>
            <artifactId>spring-boot-starter-web</artifactId>
        </dependency>

        <dependency>
            <groupId>org.springframework.boot</groupId>
            <artifactId>spring-boot-starter-amqp</artifactId>
        </dependency>

        <dependency>
            <groupId>org.projectlombok</groupId>
            <artifactId>lombok</artifactId>
            <optional>true</optional>
        </dependency>
        <dependency>
            <groupId>org.springframework.boot</groupId>
            <artifactId>spring-boot-starter-test</artifactId>
            <scope>test</scope>
            <exclusions>
                <exclusion>
                    <groupId>org.junit.vintage</groupId>
                    <artifactId>junit-vintage-engine</artifactId>
                </exclusion>
            </exclusions>
        </dependency>
    </dependencies>
</project>
- 修改配置文件
server:
    port: 8080
spring:
    application:
        name: springboot-rabbit-production
    rabbitmq: #rabbitmq配置
        host: 127.0.0.1
        virtual-host: /
        username: guest
        password: guest
        port: 5672
- 创建RabbitMQ队列与交换机绑定的配置类
/**
 * RabbitMQ队列与交换机绑定的配置类
 */
@Configuration
public class RabbitConfig {
    //交换机名称
    public static final String ITEM_TOPIC_EXCHANGE = "item_topic_exchange";
    //队列名称
    public static final String ITEM_QUEUE = "item_queue";

    /**
     * 实例化一个交换机
     * @return
     */
    @Bean
    public TopicExchange itemTopicExchange(){
        return ExchangeBuilder.topicExchange(ITEM_TOPIC_EXCHANGE).durable(true).build();
        //也可以直接new
        //return new TopicExchange("itemTopicExchange",true,false);
    }

    /**
     * 实例化一个对列
     * @return
     */
    @Bean
    public Queue itemQueue(){
        // return QueueBuilder.durable(queueName).exclusive().autoDelete().build();
        return QueueBuilder.durable(ITEM_QUEUE).build();
        //return new Queue("itemQueue",true,false,false,null);
    }

    /**
     * 绑定队列和交换机
     * @param queue
     * @param exchange
     * @return
     */
    @Bean
    public Binding itemQueueExchange(@Qualifier("itemQueue") Queue queue,
                                     @Qualifier("itemTopicExchange") Exchange exchange){
        return BindingBuilder.bind(queue).to(exchange).with("item.#").noargs();
    }
}
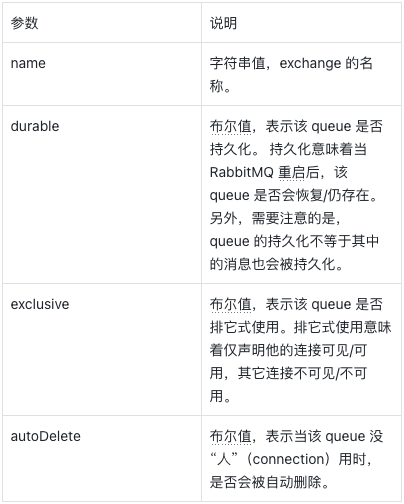
创建队列参数说明:
创建交换机参数说明:

- 创建测试类,发送消息到消息队列
@SpringBootTest
class SpringbootRabbitProductionApplicationTests {

    @Autowired
    private RabbitTemplate rabbitTemplate;

    @Test
    public void test1(){
        rabbitTemplate.convertAndSend(RabbitConfig.ITEM_TOPIC_EXCHANGE, "item.add", "SpringBoot真滴好");
        //发送的消息也可以是对象,只不过对象需要序列化
    }

    @Test
    public void test(){
        rabbitTemplate.convertAndSend(RabbitConfig.ITEM_TOPIC_EXCHANGE, "item.insert", "商品新增id...");
        rabbitTemplate.convertAndSend(RabbitConfig.ITEM_TOPIC_EXCHANGE, "item.update", "商品修改....");
        rabbitTemplate.convertAndSend(RabbitConfig.ITEM_TOPIC_EXCHANGE, "item.delete", "商品删除....");
    }
}
2、消费方搭建
创建消费者工程springboot-rabbit-consumer
- 创建消息监听处理类
方式一:
@Component
public class MyListener {

    @RabbitListener(queues = "item_queue")
    public void myMessage(String message){
        System.out.println("消费者接收到的消息为:" + message);
    }
}

方式二:
@Component
@RabbitListener(queues = "item_queue")
public class HelloReceiver {
    @RabbitHandler
    public void process(String message) {
        System.out.println("消费者接收到的消息为:"+message);
    }
}
二、消息的应答确认
- 自动确认:acknowledge="none"(默认,不推荐使用)
- 自动ACK: 消费者配置中如果是自动ack机制,MQ将消息发送给消费者后直接就将消息给删除了,这个的前提条件是消费者程序没有出现异常,如果消费者接收消息后处理时出现异常,那么MQ将会尝试重发消息给消费者直至达到了消费者服务中配置的最大重试次数后将会直接抛出异常不再重试。
- 手动确认:acknowledge="manual" ,也称手动ack (推荐使用)
- 手动ACK: 消费者设置了手动ACK机制后,可以显式的提交/拒绝消息(这一步骤叫做发送ACK),如果消息被消费后正常被提交了ack,那么此消息可以说是流程走完了,然后MQ将此消息从队列中删除。而如果消息被消费后被拒绝了,消费者可选择让MQ重发此消息或者让MQ直接移除此消息。后面可以使用死信队列来进行接收这些被消费者拒绝的消息,再进行后续的业务处理。
- 修改yml配置
server:
    port: 8081
spring:
    application:
        name: springboot-rabbit-consumer
    rabbitmq: #rabbitmq配置
        host: 127.0.0.1
        virtual-host: /
        username: guest
        password: guest
        port: 5672
        listener:
                simple:
                        acknowledge-mode: manual
            direct:
                acknowledge-mode: manual #消息的确认机制 none:自动模式(默认开启) manual:手动模式 auto:自动模式 (根据侦听器检测是正常返回、还是抛出异常来发出 ack/nack)
- 创建监听器
@Component
@RabbitListener(queues = "item_queue")
public class MyListener {

    /**
     * 方式一
     * @param str  消息内容
     * @param channel
     * @param tag    消息编号
     * @param message 消息对象
     */
    @SneakyThrows
    @RabbitHandler
     public void process(String str,
                         Channel channel,
                         @Header(AmqpHeaders.DELIVERY_TAG) long tag,
                         Message message){
        System.out.println(str);
        System.out.println(tag);
        System.out.println(message);
        channel.basicReject(tag,true);  //basicReject()用来拒绝消息,如果被拒绝的消息应该被排队而不是被丢弃
     }

      /**
     * 方式二
     * @param channel 队列通道
     * @param message 消息对象
     */
    @SneakyThrows
    @RabbitHandler
    public void process(String str,Channel channel, Message message){
       try{
           System.out.println("CorrelationId:"+message.getMessageProperties().getCorrelationId());

           System.out.println(str);//获得队列中的消息
           System.out.println(message.getMessageProperties().getDeliveryTag());
           channel.basicAck(message.getMessageProperties().getDeliveryTag(),true); //消费消息
       }catch (Exception e){
           if (message.getMessageProperties().getRedelivered()) {
               System.out.println("消息已重复处理失败,拒绝再次接收...");
               channel.basicReject(message.getMessageProperties().getDeliveryTag(), false); // 拒绝消息
           } else {
               System.out.println("消息即将再次返回队列处理...");
               channel.basicNack(message.getMessageProperties().getDeliveryTag(), false, true);
           }
       }
    }
}
- basicAck的批量应答问题说明:
- channel.basicAck(100,true) 如果前面还有4,6,7的deliveryTag未被确认,则会一起确认,减少网络流量,当然当前deliveryTag=8这条消息也会确认,如果没有前面没有未被确认的消息,则只会确认当前消息,也就是说可以一次性确认某个队列小于等于delivery_tag值的所有消息
三、消息过期时间设置
TTL 全称 Time To Live(存活时间/过期时间)。当消息到达存活时间后,还没有被消费,会被自动清除。RabbitMQ可以对消息设置过期时间,也可以对整个队列(Queue)设置过期时间。当消息超过过期时间还没有被消费,则丢弃
1、代码实现
- 修改rabbit队列配置
/**
 * RabbitMQ队列与交换机绑定的配置类
 */
@Configuration
public class RabbitConfig {
    //交换机名称
    public static final String ITEM_TOPIC_EXCHANGE = "item_topic_exchange";
    //队列名称
    public static final String ITEM_QUEUE = "item_queue";

    /**
     * 实例化一个交换机
     * @return
     */
    @Bean
    public TopicExchange itemTopicExchange(){
        return ExchangeBuilder.topicExchange(ITEM_TOPIC_EXCHANGE).durable(true).build();
        //也可以直接new
        //return new TopicExchange("itemTopicExchange",true,false);
    }

    /**
     * 实例化一个对列
     * @return
     */
    @Bean
    public Queue itemQueue(){

         return QueueBuilder.durable(ITEM_QUEUE)
                .withArgument("x-message-ttl",20000) //设置队列过期时间
                .build();
    }

    /**
     * 绑定队列和交换机
     * @param queue
     * @param exchange
     * @return
     */
    @Bean
    public Binding itemQueueExchange(@Qualifier("itemQueue") Queue queue,
                                     @Qualifier("itemTopicExchange") Exchange exchange){
        return BindingBuilder.bind(queue).to(exchange).with("item.#").noargs();
    }
}- 测试类
- 情况1:发给test_queue_ttl 队列的消息统一设置过期时间,交换机发给 test_queue_ttl 队列后,10秒后,10条消息消失
@SpringBootTest
    public class TtlTest {
        @Autowired
        private RabbitTemplate rabbitTemplate;
        /**
         * 10秒后队列中的数据消失
         */
        @Test
        public void test1(){
            for(int i=1;i<=10;i++){
                rabbitTemplate.convertAndSend("test_exchange", "ttl.h"+1, "第"+"条数据");
            }
        }
    }
- 情况2:某条消息单独设置过期时间
 @Test
public void test2(){
     MessagePostProcessor messagePostProcessor=new MessagePostProcessor() {
                @Override
                public Message postProcessMessage(Message message) throws AmqpException {
                    //刚才我们在配置文件设置的队列的消息是10秒,这里是5秒,注意:以时间短的为准
                    message.getMessageProperties().setExpiration("5000"); //消息的过期时间
                    return message;//消息一定要返回
                }
            };
      rabbitTemplate.convertAndSend("test_exchange", "ttl.haha", "哈哈哈哈",messagePostProcessor);
}- 情况3:发送给队列的n条信息中,单独给某个消息设置过期
 /**
         * 发送给队列的n条信息中,单独给某个消息设置过期
         */
        @Test
        public void test3(){
            MessagePostProcessor messagePostProcessor = new MessagePostProcessor() {
                @Override
                public Message postProcessMessage(Message message) throws AmqpException {
                    //刚才我们在配置文件设置的队列的消息是10秒,这里是5秒,注意:以时间短的为准
                    message.getMessageProperties().setExpiration("5000"); //消息的过期时间
                    return message;//消息一定要返回
                }
            };
            for(int i=1;i<=10;i++){
                if(i==5) {
                    rabbitTemplate.convertAndSend("test_exchange", "ttl.h" + 1, "第" + "条数据",messagePostProcessor);
                }else{
                    rabbitTemplate.convertAndSend("test_exchange", "ttl.h" + 1, "第" + "条数据");
                }
            }
        }
分析:当i == 5时,也就是给第五条消息设置过期时间是5秒,其它的还是10秒,发现失效,这里要注意一点,由于这条消息发送给队列的时候不是在队列的头部,故不会单独判断,而是和其它队列一样,10秒钟就消失,可以改成i==0,则第一条消息是5秒过期,或者i<3,即队列的头三条都是5秒的时间。

